5 Mistakes That Kill Your DIY Cold Frame
Watching your lettuce wilt under an early frosty night, or losing those tender seedlings to a sudden chill, is frustrating. A cold frame is the perfect answer – offering far more protection than a windowsill, but without the commitment of a full greenhouse. The best bit? You don’t need a pricey kit. With the right UK-standard materials, a few basic tools, and a weekend, you can build a solid, sub-£100 DIY cold frame. It’ll keep spinach, herbs, and hardy veg thriving for an extra four to six weeks, letting you extend your harvest well into autumn and kickstart spring earlier.
(If you’ve ever bought a cheap plastic frame that warped and leaked, you’ll understand why getting the basics right matters. Most beginners learn this over time, from their first cold frame to the ones they use on their allotment today – you can read more about our research here.)
Let’s get building.
Materials List (The “UK Standard”)
Choosing the right timber and glazing makes the difference between a frame that lasts five years and one that goes to pot after a single winter. Here’s what most owners use on their allotment in Leicestershire, and what you’ll find at any B&Q or Wickes in the UK.

| Item | Specification | Approx. Cost* |
|---|---|---|
| Timber – frame sides | Planed softwood, 50 × 50 mm (or 38 × 38 mm for a slimmer build) | £30‑£35 |
| Timber – lid supports | Same as above, plus a few 25 × 25 mm strips for the prop stick | £8‑£10 |
| Glazing | 3 mm twin‑wall polycarbonate with UV‑protective coating | £20‑£25 |
| Hardware | Galvanised 4 mm wood screws, 2 mm stainless‑steel clips, hinge pins (optional) | £6‑£8 |
| Base lining | Heavy‑weight weed membrane or double‑cardboard | £5‑£7 |
| Misc. | Sandpaper, wood preservative (optional) | £3‑£5 |
*All figures are approximate estimates based on typical UK prices at the time of writing.
Why these specs? Planed softwood fits together tighter than rough‑sawn stock, cutting down drafts that would otherwise turn your frame into a chilly box. For sturdy, long-lasting cold frames, many seasoned gardeners and resources like the RHS suggest using timber of at least 50 x 50mm, finding it the sweet spot for durability and resistance to our changeable UK weather.
Polycarbonate at 3 mm gives you a solid R‑value without the weight and cost of 4 mm, and the twin‑wall design adds a pocket of air for extra insulation. Two‑millimetre sheets simply don’t stand up to the UK’s hard frosts; they flex and crack under the strain.
Now that you know what to buy, you can Download the Free Checklist to keep track of your purchases and measurements.
Tools Required
You don’t need a full workshop, but a few basics will keep the build smooth and safe.
- Circular saw or hand saw – for cutting the timber to length.
- Drill/driver – to pre‑drill holes and drive the galvanised screws.
- Measuring tape – metric, of course.
- Spirit level – ensures the base sits perfectly square.
- Pencil – for marking cuts and drill points.
If you’ve ever tried to eyeball a cut, you’ll know why a level and a good tape are worth the extra minute.
Step‑by‑Step Build Process
Below is the core of the guide – clear, numbered actions you can follow on a Saturday morning.
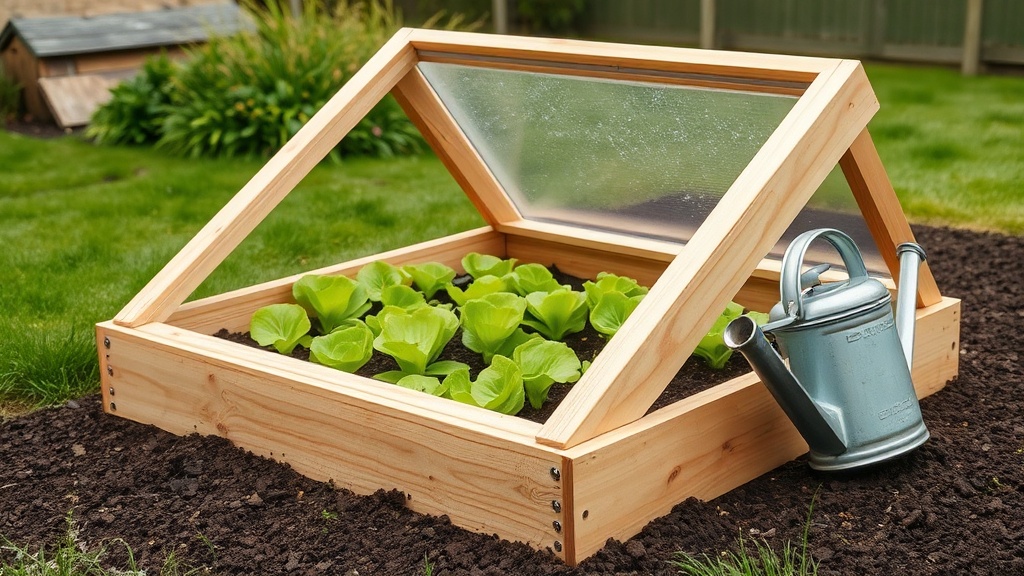
- Cut the wood – Measure and cut four 900 mm pieces for the base (adjust width to your garden space) and four 1200 mm pieces for the sloping lid. A 30° angle is recommended; it lets rain run off while still catching enough sun.
- Assemble the base – Lay the four base pieces on the ground to form a square. Pre‑drill 2 mm pilot holes at each corner, then screw the joints together with 4 mm galvanised screws. Use a spirit level to check the frame is square – a mis‑aligned base leads to water pooling later.
- Create the lid – Attach the 25 × 25 mm strips to the inner edge of each sloping side; these act as a simple “prop stick” guide. If you prefer a hinge, install a single stainless‑steel hinge on one side, but most owners find the prop stick far more reliable in windy March weather.
- Install the polycarbonate – Lay the twin‑wall sheet on a clean surface, then cut it to the exact outer dimensions of the lid. Secure it with stainless‑steel clips along the edges – never screw directly into the plastic, as thermal expansion will crack it. (That’s the thing most kits get wrong.)
- Prepare the base – Before placing the frame on the ground, lay a sheet of weed membrane or a double layer of cardboard. This drainage layer stops rainwater from sitting under the frame and rotting the timber.
A DIY cold frame built with 50 × 50 mm planed softwood and 3 mm twin‑wall polycarbonate offers the best balance of strength, insulation and cost for UK gardeners. The timber resists wind and frost, while the polycarbonate traps heat without cracking under temperature changes. Adding a simple prop stick for ventilation and a weed‑membrane base prevents overheating and waterlogging, meaning the frame can protect seedlings from hard frosts down to –5 °C for up to six weeks beyond the normal season.
Now you have a sturdy, weather‑proof shelter ready for sowing early spring seedlings or overwintering hardy greens.
How Do I Ventilate My Cold Frame Through the Seasons?
Ventilating your cold frame correctly is crucial to prevent overheating and ‘greenhouse effect’ scorch. It’s not a sealed box, and controlled airflow is essential to keep plants healthy, especially on sunny days. Here’s how most owners manage it through the year to ensure their plants thrive.
- The “Prop Stick” Trick – Place a 600 mm wooden stick against the lid on sunny days. Prop it just enough for a thin gap; this lets excess heat escape while still keeping the frame warm. Most beginners forget to prop the lid once and the seedlings turn a sad shade of brown – a classic heat‑stress mistake.
- Spring & Summer – Open the prop stick fully on warm days. If the temperature tops 15 °C, slide the lid back completely and let the frame act as a cold‑frame‑plus‑cold‑bench hybrid.
- Autumn – Start closing the lid each evening as nights chill. The twin‑wall polycarbonate holds heat well, extending the growing season by 4‑6 weeks.
- Winter – Seal the frame tight. The weed‑membrane base ensures any rain that does get in drains away, preventing waterlogging that can drown seedlings in heavy UK rain.
Do’s and Don’ts for ventilation
- Do use the prop stick to create a 10‑15 mm gap on sunny days.
- Do check the lid daily for condensation; a quick wipe prevents mould.
- Don’t leave the lid fully closed on bright, warm days – seedlings can scorch.
- Don’t prop the lid with a flimsy piece of plastic; wood holds up better against wind.
Following these steps means your frame works from early March right through to November without turning your lettuce into a wilted mess.
Troubleshooting & Maintenance
Even the best‑built frame can develop quirks. Here’s what to watch for and how to fix it.
- Rotting timber – If you notice the wood darkening or feeling soft, treat the affected areas with a wood preservative (available at any DIY store). Most beginners once leave a frame standing on damp ground for a whole winter; the bottom 2 inches rot. Raising the frame 2‑3 inches off the ground, as recommended by GrowVeg, prevents this.
- Leaking joints – Check the clips around the polycarbonate. If water seeps in, apply a thin bead of silicone sealant around the edges – a quick fix that does the trick without compromising the panel’s expansion.
- Cold spots – Feel the base on a chilly night; if one side feels significantly colder, the frame may be sitting on uneven ground. Shim with small pieces of scrap timber to level it.
A “red flag” to keep an eye on is any mould growing on the weed membrane. Replace it if it gets soggy; a fresh sheet costs less than £5 and keeps the base dry.